
Showing posts with label craft. Show all posts
Showing posts with label craft. Show all posts
07 October 2010


09 December 2009
second of the final three!
 This weekend's show Handmade Holiday Craft Show is by far one of my favorites. There's such a good energy this close to the holiday break. Folks are generally cheerful and appreciative of the creative spirit in the room. Fun times. Come on over if you're in RVA and we'll share in the spirit together.
08 December 2009
Appreciation

Catching up on a little color love from Mary Lou Zeek Gallery, which carries Silver Tree Art in the gallery shop! Blog entry from October 2009.
30 November 2009
handmade holiday love [1 of 3]


the final three holiday shows for silver tree art begin this saturday with the 6th annual Ginter Park Holiday Show. come on by! you can also find my wears online in my etsy shop. new wears will be added this week!
25 November 2009
gratitude + thanksgiving: abc cards for sharing
 An amazing, sweet way of sharing thankfulness provided by a personal blog favorite Inchmark on Design*Sponge's Blog. Enjoy! We'll be printing these and sharing thoughts together. I think I'll create a set for my grandfather, too, during his recovery.
 happy. thanks. gratitude. be with you and yours.
24 November 2009
creative fall love & inspiration

ages old image that makes me laugh today in a moment
that laughter offers a moment of healing.
these days are the days that my need to sew and knit kicks into full gear. if you've seen my hands at any time, you know that they appreciate being used. you'd know that when my hands are working they are doodling, carving, stitching, loving, chopping, kneading, or gardening. these cool turned colder days where the sky is a shade of gray calls for charcoal gray polish (yes, i love it but am still in search of the perfect shade), earl gray tea (or some other favorite variety), and something warm to work with.
in seeking distraction this morning while my grandfather's recovering from multiple surgeries yesterday, i looked up some great tutorials on one of my favorite sites: Grosgrain. check out this incredible list of scarf tutorials. one of my favorites, #14 could easily translate into a liturgical stole. in fact, i maybe creating one or two. i've had one that's a granny quilt style cut for a few years that hasn't come together. one that i wanted to reflect how our edges, however jagged can fit together and also resemble something of beauty. we'll see. in the meantime, i'm completely inspired by this soul and her sweet attitude of sharing.
clergy friends: picture a collaborative project on a wednesday night or in worship whereby members of your community pick out a piece of cloth that can be placed on a cut fabric using a safety pin, where each person's piece can represent peace, hope, love, healing. something that they release. the possibilities of meaning are endless, really. these scraps of fabric can overlap, but should never fully cover another's. later hands in the community can gather together and stitch the pieces onto the stole or parament. what a visual image of community and coming together. piece work becomes peace work. perhaps a tragedy in the community, betrayal or reconciliation. take the inspiration and incorporate it into your work and ministry. a gift for you. this can work in a family space as well or among friends or other groups.
sew well. sew complete. sew the pieces into wholeness. each moment of our day can offer an opportunity to sew together good wishes, prayers, and attitudes into one warm, rich, loving bundle. today's project will be shared as i create an appliqued shirt from my son. it's richly entrenched with meaning. i find it particularly appropriate that as i applique i pray for and celebrate the man for whom my son is named, adding more meaning and ritual to this shirt.
always: more to come. peace. love. healing. touch. grace. joy. thanks.
18 November 2009

16 November 2009
the weekend in photos

what a great turnout for the Holiday Hotcakes show in Baltimore! my goodness. there were so many great artists there. so many kindred spirits in one space.

we enjoyed brunch a.k.a. my all-time-favorite-meal-of-the-day at my favorite spot for just such a meal in Baltimore: Mrs. Shirley's. Yum and yum! these glorious chocolate waffles were among the delicious food we enjoyed. so so good. the day was perfect for outdoor dining!
 kacey of Found Studio's online etsy shop holds all sorts of goodness. i love love love her paintings. so beautiful. we have 3 of her tasty bacon ornaments for the tree and egg ornaments to come! kacey's work will be at our richmond holiday hotcakes show december 15th!
  ana's hands with her beautiful polish! i love the work that ana puts into her pottery and jewelry. she's a potter, minister, and traveler (among other talents). ana's work will also be in the richmond holiday hotcakes show!
gary's shadow boxes are simply amazing. the boxes are constructed of old door frames and each box carries a story. i love looking into these and getting caught in a dream of the story. his photography is awesome, as one graces my happy studio. his work can be purchased from Red Tree Baltimore where gary will greet you with the best of smiles. one of these will be mine very, very soon. we hope to have a few of these at the richmond holiday hotcakes show as well!
 my concentric table circles captured. i love these and they received so many compliments. had to share this image, which i truly enjoy. this great program is called ShakeItPhoto for iphone. thanks to sarah of the small object for posting about this app! i've been wanting something fauxlariod (in the spirit of polariod) and i like this program better than the other i downloaded.
  new celebration circle ornaments available through the holidays to meet my blessing birdie ornaments. love, love these and the meaning that goes into the pockets on the opposite side as pictured. soon to come in my etsy shop.
and the quilt is complete. i left her with her new happy owners. she was fun to work on this past year. i have ideas for some lap quilts that i'll do next, modeled after one that my grandmother made for me years and years and years ago (okay, so i was in high school). still a few years ago.
more to come this week as my energy returns and shows, along with facilitation bereavement support groups, are a little more spaced out. until then, enjoy these kindred spirits and the wonderful work of their hands! cheers.
30 October 2009
life stories: the knight with green socks
 the young knight with green socks was on a quest. his quest led him to this spot and this moment. he needed to find something, but what? he knew he needed to keep on the move, following and leading all at once.
soon the young knight found a place to sing with friends. he then found a place to sit and eat molasses cookies & yummy treats with his costumed classmates. after singing, eating, drinking, and dancing the knight had fulfilled his quest. he enjoyed each moment and was satisfied.

 the young mother found herself dressed up as well, looking something between a man-ghost, newspaper boy & golfer with amazing socks. she was pleased looking at her feet, thankful for the steps of this day.
08 September 2009
creative spaces: my sweet desk
 The Before Shot. do i really want to show you this? no. am i pleased with myself for the transformation? oh, my. yes! while my upstairs is my "studio/office", it's become a catch-all before our two weeks away. since then, it's remained in distressing form. thanks to reframe + ambition over the last week, i've been working at getting it into a space that i want to walk into and be. i want the space to calm me, not make my heart rush.
  here's a slight close-up taken last night once the desk was 'finished for the night'. There will be more transformation that will come to the upstairs space, but taking it one-day-at-a-time is helping.
 the desk, taken in the morning hours. i love using small containers for items that i need quickly. you'll see the GO box, files, my many favorite pens & pencils, labels, jewelry tools, etc. my desk is a working desk for my business, life, and art. it's all together, yet will have its separate places through the filing system.
 the 'i-am-the-label-maker' labels. while i like the idea of a label maker, i'm also trying to use what i already have in this process. all things repurposed + vintage. today i'll make a purchase for some more clear file folders (which i love using for my business/art) and colored papers to finish out the list.
 my son was inspired. so sweet. my son's happy desk, inspired by mine. he stood in awe (quite literally very still with his mouth open and as he reached for my paperclips, "do you want a desk like this?" "yes! i need pencils. i need red paperclips...")
seven minutes later, here's his desk. "his" camera for inspiration, a handy "lamp" and containers with his bees wax crayons, colored pencils, brushes, scissors, and a house box for his handmade paper books. you'll see a colorful assortment of his paperclips, too. but the best: his recycling container is a the bottom of his desk, too. it contains his cutting scraps as you see him working on. he's telling me now that, "i'm sitting at my desk drawing a gift picture for uncle john."
good gravy. this is great. even a three-and-a-half year old has cleared his spaces and is creating!
i must tell you that if you're inspired by this, you should be. i'm amazed at how good it feels to know that more good things are coming. there's been new plans and inspiration flowing over the summer, but still i've needed to be more organized. i can feel this is a good thing. a really good process to be engaged in. saying this because you receive a gift of hope, a good word, and much encouragement along the way. you don't go it alone, but with others. i love the life journey that we're on together.
check out reframe's program and go ahead, sign up! sessions start each monday.
04 September 2009
sharing organization: project journal on a cigar box organizer
 thanks to the re[frame] process soon to begin next week, i was motivated to create a creative box for part of the system. if you're not so into making your own, you can find this amazingly cute one with cards on etsy by FreestyleGifts, which inspired the use of tabs on mine.
 to make a card file like this one, you'll need the following materials:
 step 1: gather your materials. take a deep breath. take another, and another. invite the creative spirit to be with you as you create.
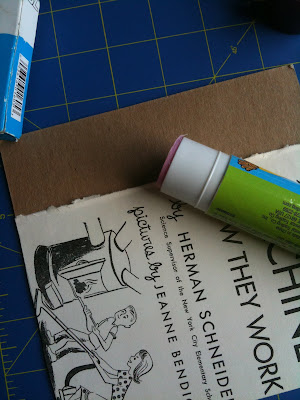 step 2: taking you stack of cardboard or other materials, measure the dividers. the ones here are cut to a 5 1/8 x 6 inches. you can round to 5 x 6 inches if you so choose. you'll see the method below.
 step 3: decorating the dividers: option a: if using paper, measure and mark the paper according to the way you want it placed on the card. i liked having some of the cardboard shown, as seen below. cut and paste the paper onto your cardboard divider. i made each of my decorative elements wrap underneath each divider and adhered them onto the back side as well. (option b: using fabric is below)
 step 4: the line to the right is marking the 5 1/8 line, as my cardboard was larger than needed. you may have done this in the previous step.
 step 5: using the glue bottle on hand, i marked "tabs" in one of four spots on my dividers. you may use more or less according to your preference. the divider itself without the tab measures 4.5 x 6 inches, with the tab extending beyond the 4.5 inches.

 step 6: cut along your top edge using your mat cutter, x-acto knife, etc. If using recycled materials such as the organic mac n cheese box below, paper cutting scissors will be enough. i like the straight lines that a blade can provide.
 reclaimed boxes or art (below) can also be used as dividers,
 watercolors from college that i have saved for years are now 6 dividers.
 step 3: option b: if you want to use fabric to cover your dividers as i have done, here are the steps.
 after making your dividers with tabs, take each divider and glue the fabric to the front side, leaving room to turn the divider over and wrap fabric onto the back.

 press out evenly. some glue may squeeze through, and if you don't want to peel the glue off your hands, you can use the base of the glue bottle to smooth out the fabric. using your fabric scissors, trim the fabric along the entire divider.
 be careful not to cut the cardboard with your fabric scissors, as you don't want to dull the blade. you may think ahead and trace the divider onto the fabric, cutting it first. either way works.

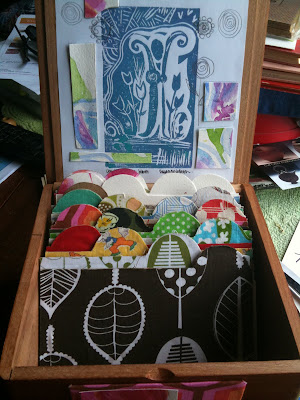 ta-da. once you have completed the process you'll have a crafty box with sweet dividers in your own style. here you'll see a mix of vintage and modern fabrics that i use in my artwork. i was motivated to decorate the box itself, using leftover pieces of fabric, the watercolors scraps, and a block print incorporated into mixed media.
 this project turned out so well that i'll be creating some cigar boxes as mixed media for the holiday shows. some will be project boxes that you can take and make yourself, which i will offer in my etsy shop. i love what creativity can spring forth in a day.
cigar box (this one is a 7 inch box, 4 inches tall)
cardboard, watercolor paper, or cereal boxes for 15-20 dividers
cards (these are a 4 x 6 vintage cardstock)
art materials, fabric, or old books to decorate the cardboard
glue, glue sticks, or adhesive that will work with your materials
pencil, scissors, and cutting tool (mat cutter seen below)
optional: materials to decorate the cigar box
 step 1: gather your materials. take a deep breath. take another, and another. invite the creative spirit to be with you as you create.
 step 2: taking you stack of cardboard or other materials, measure the dividers. the ones here are cut to a 5 1/8 x 6 inches. you can round to 5 x 6 inches if you so choose. you'll see the method below.
 step 3: decorating the dividers: option a: if using paper, measure and mark the paper according to the way you want it placed on the card. i liked having some of the cardboard shown, as seen below. cut and paste the paper onto your cardboard divider. i made each of my decorative elements wrap underneath each divider and adhered them onto the back side as well. (option b: using fabric is below)
 step 4: the line to the right is marking the 5 1/8 line, as my cardboard was larger than needed. you may have done this in the previous step.
  step 5: using the glue bottle on hand, i marked "tabs" in one of four spots on my dividers. you may use more or less according to your preference. the divider itself without the tab measures 4.5 x 6 inches, with the tab extending beyond the 4.5 inches.
  step 6: cut along your top edge using your mat cutter, x-acto knife, etc. If using recycled materials such as the organic mac n cheese box below, paper cutting scissors will be enough. i like the straight lines that a blade can provide.
  reclaimed boxes or art (below) can also be used as dividers,
 watercolors from college that i have saved for years are now 6 dividers.
 step 3: option b: if you want to use fabric to cover your dividers as i have done, here are the steps.
 after making your dividers with tabs, take each divider and glue the fabric to the front side, leaving room to turn the divider over and wrap fabric onto the back.
 press out evenly. some glue may squeeze through, and if you don't want to peel the glue off your hands, you can use the base of the glue bottle to smooth out the fabric. using your fabric scissors, trim the fabric along the entire divider.
 be careful not to cut the cardboard with your fabric scissors, as you don't want to dull the blade. you may think ahead and trace the divider onto the fabric, cutting it first. either way works.
for the labels, i'm working on circular labels that i'll draw & scan, print & cut and glue onto the files. if i am able to, i'll put the labels on the blog as a download, but no promises.
 ta-da. once you have completed the process you'll have a crafty box with sweet dividers in your own style. here you'll see a mix of vintage and modern fabrics that i use in my artwork. i was motivated to decorate the box itself, using leftover pieces of fabric, the watercolors scraps, and a block print incorporated into mixed media.
  this project turned out so well that i'll be creating some cigar boxes as mixed media for the holiday shows. some will be project boxes that you can take and make yourself, which i will offer in my etsy shop. i love what creativity can spring forth in a day.
 i've also made a pouch to keep cards in for on-the-go travels, which i'll show on another post. cheers.
30 August 2009
Inspiring Spaces: Alabama Chanin
With our recent Tour of the South, I spent an afternoon in AL receiving hospitality, inspiration, and appreciation from another creative spirit whose work I am in awe.

it is not the length of life, but the depth of life.
These words are carved into this old chair at the Alabama Chanin @ The Factory, in Florence, AL. Natalie Chanin, author and designer, impresses me so much with the details that go into her work. In the chair above, she has woven men's ties, leaving the ends to hang underneath the chair. I love her quote as seen above, which is likely to inspire a new block print or drawing in my upcoming quotes/mantras series. So lovely.

A glimpse of one of the table spaces in The Factory. So much of what we vintage-loving gals enjoy: silver, glass jars, milk glass, wooden spools of thread, scissors, and worn wood. The assortment carries me to the windows in my grandmother's home, with the glass elements catching the light.
 A wedding dress with so much detail. Really lovely.
 A headscarf, as seen in Natalie's book Alabama Chanin. You can attend workshops in The Factory where you can make one of these great pieces.
 the simple beauty of strips of cloth hanging near the cutting tables.
 A burst of rainbow colors from the stores of t-shirts. The cotton jersey fabrics are so soft. You just want to run your hands over them or possibly curl up in one!
 Inspiration. I love to see so many good books lining these shelves. Some of these are on my wish list and I was so pleased to preview them. STC Craft/Melanie Falick Books are just so good. (All that I have & have previewed have been good. Really good.) What makes me happy is to see that our library system carries many of them, and if they don't you can request a library purchase, just as I did for Natalie's book: Alabama Stitch Book: Projects and Stories Celebrating Hand-Sewing, Quilting, and Embroidery for Contemporary Sustainable Style.
 My favorite finds: vintage quilts reclaimed, repaired, and loved. Natalie has written in script on the quilt and then it's hand embroidered. I love that these quilts are tended so well and cared for through repair. They are given a new spirit, transformed through the details & work going into them. Such artistry inspired me to transform my women's retreat with a quilting projects The Work of Our Hands to include an existing quilt in need of love as a part of the project. Inspiring spaces. Inspiring women. And don't you love that a quilt says buttermilk?
Inspiration flows from hands a century ago to hands today. I love the work of many hands that touch these pieces of art.
Like the art and the space the folks at Alabama Chanin are a treat. Hospitality was shared. I was attended to effortlessly as the work day continued for these folks. Busy, busy bees. I found inspiration and learned a great deal through Natalie's success and style. Natalie is as gracious as her team. I appreciated the moments meeting her. My time there was well spent and continues to inspire me. I'm sure that as I continue to make way re-creating my studio upstairs, I will be inspired by my visit to Natalie's wonderful space. Thanks, Alabama Chanin!
Subscribe to:
Posts (Atom)