 thanks to the re[frame] process soon to begin next week, i was motivated to create a creative box for part of the system. if you're not so into making your own, you can find this amazingly cute one with cards on etsy by FreestyleGifts, which inspired the use of tabs on mine.
 to make a card file like this one, you'll need the following materials:
 step 1: gather your materials. take a deep breath. take another, and another. invite the creative spirit to be with you as you create.
 step 2: taking you stack of cardboard or other materials, measure the dividers. the ones here are cut to a 5 1/8 x 6 inches. you can round to 5 x 6 inches if you so choose. you'll see the method below.
 step 3: decorating the dividers: option a: if using paper, measure and mark the paper according to the way you want it placed on the card. i liked having some of the cardboard shown, as seen below. cut and paste the paper onto your cardboard divider. i made each of my decorative elements wrap underneath each divider and adhered them onto the back side as well. (option b: using fabric is below)
 step 4: the line to the right is marking the 5 1/8 line, as my cardboard was larger than needed. you may have done this in the previous step.
 step 5: using the glue bottle on hand, i marked "tabs" in one of four spots on my dividers. you may use more or less according to your preference. the divider itself without the tab measures 4.5 x 6 inches, with the tab extending beyond the 4.5 inches.

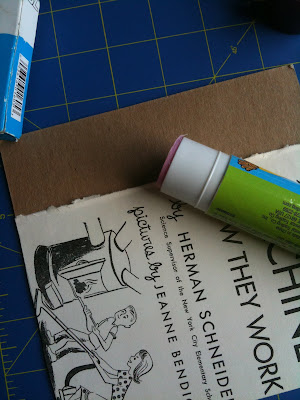
 step 6: cut along your top edge using your mat cutter, x-acto knife, etc. If using recycled materials such as the organic mac n cheese box below, paper cutting scissors will be enough. i like the straight lines that a blade can provide.
 reclaimed boxes or art (below) can also be used as dividers,
 watercolors from college that i have saved for years are now 6 dividers.
 step 3: option b: if you want to use fabric to cover your dividers as i have done, here are the steps.
 after making your dividers with tabs, take each divider and glue the fabric to the front side, leaving room to turn the divider over and wrap fabric onto the back.

 press out evenly. some glue may squeeze through, and if you don't want to peel the glue off your hands, you can use the base of the glue bottle to smooth out the fabric. using your fabric scissors, trim the fabric along the entire divider.
 be careful not to cut the cardboard with your fabric scissors, as you don't want to dull the blade. you may think ahead and trace the divider onto the fabric, cutting it first. either way works.

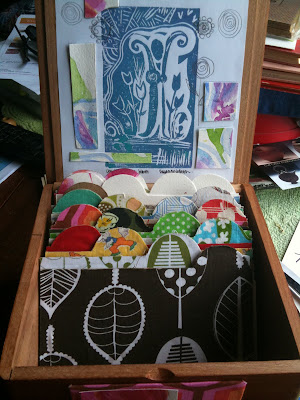 ta-da. once you have completed the process you'll have a crafty box with sweet dividers in your own style. here you'll see a mix of vintage and modern fabrics that i use in my artwork. i was motivated to decorate the box itself, using leftover pieces of fabric, the watercolors scraps, and a block print incorporated into mixed media.
 this project turned out so well that i'll be creating some cigar boxes as mixed media for the holiday shows. some will be project boxes that you can take and make yourself, which i will offer in my etsy shop. i love what creativity can spring forth in a day.
cigar box (this one is a 7 inch box, 4 inches tall)
cardboard, watercolor paper, or cereal boxes for 15-20 dividers
cards (these are a 4 x 6 vintage cardstock)
art materials, fabric, or old books to decorate the cardboard
glue, glue sticks, or adhesive that will work with your materials
pencil, scissors, and cutting tool (mat cutter seen below)
optional: materials to decorate the cigar box
 step 1: gather your materials. take a deep breath. take another, and another. invite the creative spirit to be with you as you create.
 step 2: taking you stack of cardboard or other materials, measure the dividers. the ones here are cut to a 5 1/8 x 6 inches. you can round to 5 x 6 inches if you so choose. you'll see the method below.
 step 3: decorating the dividers: option a: if using paper, measure and mark the paper according to the way you want it placed on the card. i liked having some of the cardboard shown, as seen below. cut and paste the paper onto your cardboard divider. i made each of my decorative elements wrap underneath each divider and adhered them onto the back side as well. (option b: using fabric is below)
 step 4: the line to the right is marking the 5 1/8 line, as my cardboard was larger than needed. you may have done this in the previous step.
  step 5: using the glue bottle on hand, i marked "tabs" in one of four spots on my dividers. you may use more or less according to your preference. the divider itself without the tab measures 4.5 x 6 inches, with the tab extending beyond the 4.5 inches.
  step 6: cut along your top edge using your mat cutter, x-acto knife, etc. If using recycled materials such as the organic mac n cheese box below, paper cutting scissors will be enough. i like the straight lines that a blade can provide.
  reclaimed boxes or art (below) can also be used as dividers,
 watercolors from college that i have saved for years are now 6 dividers.
 step 3: option b: if you want to use fabric to cover your dividers as i have done, here are the steps.
 after making your dividers with tabs, take each divider and glue the fabric to the front side, leaving room to turn the divider over and wrap fabric onto the back.
 press out evenly. some glue may squeeze through, and if you don't want to peel the glue off your hands, you can use the base of the glue bottle to smooth out the fabric. using your fabric scissors, trim the fabric along the entire divider.
 be careful not to cut the cardboard with your fabric scissors, as you don't want to dull the blade. you may think ahead and trace the divider onto the fabric, cutting it first. either way works.
for the labels, i'm working on circular labels that i'll draw & scan, print & cut and glue onto the files. if i am able to, i'll put the labels on the blog as a download, but no promises.
 ta-da. once you have completed the process you'll have a crafty box with sweet dividers in your own style. here you'll see a mix of vintage and modern fabrics that i use in my artwork. i was motivated to decorate the box itself, using leftover pieces of fabric, the watercolors scraps, and a block print incorporated into mixed media.
  this project turned out so well that i'll be creating some cigar boxes as mixed media for the holiday shows. some will be project boxes that you can take and make yourself, which i will offer in my etsy shop. i love what creativity can spring forth in a day.
 i've also made a pouch to keep cards in for on-the-go travels, which i'll show on another post. cheers.
This is great, Suzanne! I love your box and your instructions.
ReplyDeleteWill be joining reframe myself on Monday.
See you there!
Thea from Canada
www.encaustic.ca